Providing custom Liferay Login Page with React Client Extension
Learn how to override the default Liferay login page using React Client Extensions. This comprehensive guide walks you through creating a custom, branded login experience that seamlessly integrates with your Liferay portal while maintaining security and user experience best practices.
Introduction
Even though Liferay gives you a lot of flexibility in creating your pages, menus, and content, the login page modification options are quite limited. Still, many companies face the need to customize the login page to fit their branding and user experience requirements. While some of these customizations can be achieved using themes or global CSS, it gets more complicated if you want full control over the login page.
This article will guide you through the process of creating a custom login page for your Liferay portal using React Client Extensions.
Why Custom Login Pages Matter
In many cases, we don't need a custom login page beyond the one already provided, especially since there are some useful out-of-the-box functionalities from Liferay. In most cases, I would say some styling should be enough.
On the other hand, there are special cases where we need something more complex. Sometimes we need custom logic for external system integration, and sometimes we just need more control over the UI for branding reasons.
Options for providing custom login page
Liferay out of the box does not provide a straightforward way to implement your own custom login page. There are some options involving creating a regular page and then modifying portal properties to use it, but from my experience, this approach doesn't work as well as it should.
The second option would be to use an OSGi fragment to overwrite the default login JSP. This approach works and is quite simple, but then we're dealing with JSPs, which are not the newest technology and not the preferred choice for modern development anymore.
We could of course also modify the default login with custom JS, but then it would first be rendered with the regular view and then modified with custom JS, which is not ideal for user experience.
For a project I'm working on right now, I wanted to take a better approach: use React as this is the default choice these days, don't make it overcomplicated, and also, if possible, make it work with Client Extensions. This guide will show you what I figured out.
Custom Login Page Architecture
The way we will achieve React Client Extension integration with the Liferay login page is quite straightforward: we will reuse the already mentioned option to overwrite the JSP with a fragment, but instead of writing custom JSP code, we will only remove the default inputs and call our custom React component.
We won't change the action logic of the portlet. This way we can reuse all the existing validations and security measures, and only focus on providing a new layout. Of course, providing a custom login hook would also be possible, and this is something I actually did in the past, but this is not really required for this case.
Setting Up Your React Client Extension
First of all, we need to create a React Client Extension. This article doesn't focus on the details of Client Extensions themselves, especially since this topic is quite common and is well documented.
There are a few things you need to consider though to make the whole thing work:
- You need to keep the same input names as in the default Liferay Login Page: this way we can achieve integration with existing portlet code
- You need to call the same URL as the Liferay login page form normally does
For the first thing: you can check the regular login HTML code and see how the inputs are named, but basically there's always a _com_liferay_login_web_portlet_LoginPortlet_ prefix (to target the correct portlet) and then the name of the input.
The important ones include:
- login (
_com_liferay_login_web_portlet_LoginPortlet_login) - password (
_com_liferay_login_web_portlet_LoginPortlet_password) - rememberMe (
_com_liferay_login_web_portlet_LoginPortlet_rememberMe) - this one is not really required but it's nice to have such an option - formDate (
_com_liferay_login_web_portlet_LoginPortlet_formDate)
And then there are a few which we can ignore:
- redirect (
_com_liferay_login_web_portlet_LoginPortlet_redirect) - saveLastPath (
_com_liferay_login_web_portlet_LoginPortlet_saveLastPath) - doActionAfterLogin (
_com_liferay_login_web_portlet_LoginPortlet_doActionAfterLogin) - checkboxNames (
_com_liferay_login_web_portlet_LoginPortlet_checkboxNames)
There is also one parameter we need to send without the LoginPortlet prefix: p_auth - this is the name of the parameter which contains a token related to authentication. It can be obtained using window.Liferay.authToken.
So the minimum version of the form could look like this:
<div className="login-container">
    <div className="login-content">
        <form method="POST" action={getFormAction()} className="login-form">
            <input
                type="hidden"
                name="_com_liferay_login_web_portlet_LoginPortlet_formDate"
                value={Date.now().toString()}
            />
            {/* CSRF token*/}
            {typeof window !== 'undefined' && window.Liferay?.authToken && (
                <input
                    type="hidden"
                    name="p_auth"
                    value={window.Liferay.authToken}
                />
            )}
            <div className="login-form-group">
                <Input
                    label="User Name / E-Mail"
                    type="text"
                    name="_com_liferay_login_web_portlet_LoginPortlet_login"
                    value={username}
                    onChange={setUsername}
                    placeholder=""
                />

                <Input
                    label="Password"
                    type="password"
                    name="_com_liferay_login_web_portlet_LoginPortlet_password"
                    value={password}
                    onChange={setPassword}
                    placeholder=""
                />

                <div className="login-extra">
                    <div className="login-checkbox">
                        <label className="checkbox-label">
                            <input
                                type="checkbox"
                                name="_com_liferay_login_web_portlet_LoginPortlet_rememberMe"
                                checked={rememberMe}
                                onChange={(e) => setRememberMe(e.target.checked)}
                                className="checkbox-input"
                            />
                            <span className="checkbox-text">Remember me</span>
                        </label>
                    </div>
                </div>
            </div>
        </form>
    </div>
</div>
This is just a basic example - you need to handle all the states, styling, and so on. Nevertheless, this is part of the code I used for the actual implementation.
One of the parts that might not be clear is what the getFormAction method used in the form action does. This is actually a method which provides a URL with some required parameters and could look like this:
    const getFormAction = () => {
    const currentUrl = window.location.href;
    const url = new URL(currentUrl);

    // Build the form action URL with required portlet parameters
    url.searchParams.set('p_p_id', 'com_liferay_login_web_portlet_LoginPortlet');
    url.searchParams.set('p_p_lifecycle', '1');
    url.searchParams.set('p_p_state', 'normal');
    url.searchParams.set('p_p_mode', 'view');
    url.searchParams.set('_com_liferay_login_web_portlet_LoginPortlet_javax.portlet.action', '/login/login');
    url.searchParams.set('_com_liferay_login_web_portlet_LoginPortlet_mvcRenderCommandName', '/login/login');

    return url.toString();
};
Of course, you can add any further modifications like headers, links, sign-in with other services, etc. In the end, this could for example look like this:
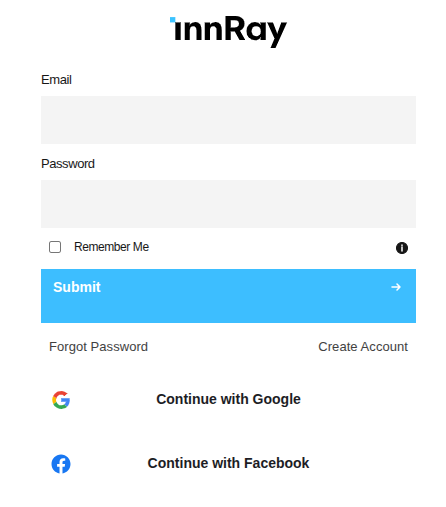
Integrating our login form with Liferay
Once we have the running React component as a Client Extension, we need to integrate it with Liferay. This is actually quite simple: we just need to overwrite the default login JSP with our custom one. To do so, we need a custom OSGi fragment which will overwrite the default login JSP.
We start by creating a standard OSGi module. The magic happens in the bnd.bnd file:
Bundle-Name: net.casion Login Web Fragment
Bundle-SymbolicName: de.netcasion.login.web.fragment
Bundle-Version: 1.0.0
Fragment-Host: com.liferay.login.web;bundle-version="6.0.65"
Fragment-Host is the key part here. This way we tell OSGi that we want to overwrite the default login JSP. We of course need to target the correct bundle version from Liferay - in my case it was 6.0.65. In your case it can be a different version depending on the Liferay version you're running. This can be checked in the gogo shell by running:
lb login
You can also target more than one version by using something like bundle-version="[6.0.00,6.0.99]"
Then we need to create the correct folder structure - this is important because if our file is named differently or lays in the wrong directory, it won't be used. From the parent structure we need the following structure:
src/main/resources/META-INF/resources/login.jsp
In the login.jsp, I would propose to, at first, put the original JSP code from Liferay (you can find it on GitHub). Next, you can remove whatever you don't need, like the original form inputs. In my case, I only kept the validation error display.
The last step is to include our custom component. I did that at the bottom of the JSP (after error handling). Including our Client Extension can be done by simply using <script> tags with the path to our JS file. If we have custom CSS also in our Client Extension, we can include it here as well.
Example:
<script type="module" src="<%= PortalUtil.getStaticResourceURL(request, "/o/innray-login/assets/index.js") %>"></script>
<link rel="stylesheet" href="<%= PortalUtil.getStaticResourceURL(request, "/o/innray-login/assets/index.css") %>"/>
Just make sure to use the correct paths based on your Client Extension configuration!
Then we need to put the custom HTML tag which corresponds to the Client Extension configuration. We can also pass custom attributes there as data-props. In my case, I ended up with:
<re-next-login data-company-name="<%= company.getName() %>" data-create-account-url="<%=createAccountURL%>"
data-forgot-password-url="<%=forgotPasswordURL%>"></re-next-login>
Important: In my case, I had to define the taglib <%@ taglib prefix="c" uri="http://java.sun.com/jsp/jstl/core" %> on top of my login.jsp, even though it should not be required as the original init.jsp is still used.
Conclusion
Once we deploy our custom Client Extension and overwrite the default login JSP, we're done. We can now use our custom login page with all the benefits of React while maintaining Liferay's validations and security.
While this hybrid approach combines two technologies, it provides the best balance of flexibility and maintainability. Because we're injecting React in login.jsp, it should be relatively easy to maintain during Liferay upgrades. However, like with any OSGi fragment, you need to pay extra attention to it during migrations and ensure the Fragment-Host bundle version is updated accordingly.